Welcome to the second blog post in our “Kubeflow Fundamentals” series specifically designed for folks brand new to the Kubelfow project. The aim of the series is to walk you through a detailed introduction of Kubeflow, a deep-dive into the various components and how they all come together to deliver a complete MLOps platform.
If you missed the first installment in this series, check out, “Kubeflow Fundamentals: An Introduction – Part 1”.
In this post we’ll take a look at what a machine learning (ML) workflow is and how Kubeflow’s various components fit into it. Ok, let’s dive right in!
What is a machine learning workflow?
Before we answer that question, let’s do a quick recap of what “machine learning” is.
ML is a sub-discipline of artificial intelligence (AI) that focuses on the use of data and algorithms to gradually improve the accuracy of solving a particular problem. The resulting code consists of the algorithm and learned parameters, which is commonly referred to as a “trained model.”
So, what exactly is a “machine learning model”?
An ML model is a piece of code that can be written in just about any language (although Python appears to be the most popular choice, I have seen PHP-based models!), that a data scientist makes “more intelligent” by having it “learn” through training against data. So, as you can imagine, a model will only be as good as the data, training, tuning and applicability to the original problem.
For example, a model that uses stock market data to predict the weather sounds like an incredibly bad idea. No matter how big your data set or clever your algorithm is! Meanwhile, a model that aims to predict the weather in a specific city 7 days from now that has access to 150 years of meteorological data stands a better chance of giving a more reliable result!
Ok, so what is a “machine learning workflow” then?
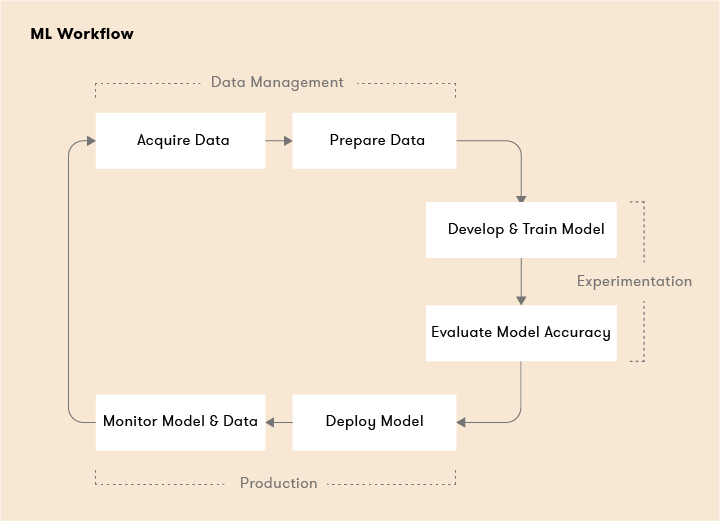
When taking ML models from development to production you are going to need some sort of logical workflow to stand any chance of success. This workflow will typically consist of several (more than likely iterative) steps. What we mean by “iterative” is that depending on the results you get at the end of each step, you may have to go back to a previous step and rethink your problem, your choice in framework or algorithms, quality of your dataset and/or if the model has been sufficiently trained (without being “overtrained”) and tuned.
How does a machine learning workflow work?
Your typical ML workflow can be broken down into two major phases, a pre-production or “experimental” phase and “production” phase.
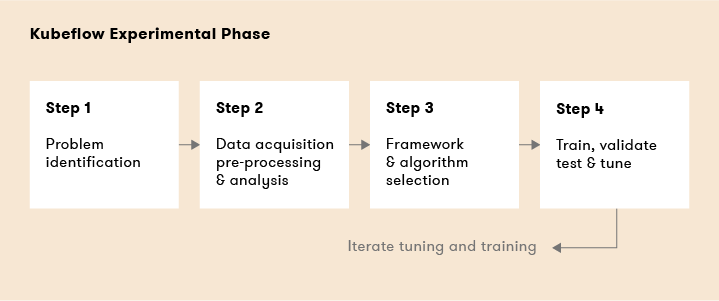
Experimental Phase
In the experimental phase you develop your model based on initial assumptions, then test and update the model iteratively to produce the results you’re looking for.
Step 1: Problem Identification
In this step we need to clearly define exactly what problem we are trying to solve with our workflow. For example, we might want to identify spam in incoming email, scan MRI images to find specific attributes to aid in diagnosis, or analyze system and monitoring data to predict the mean-time-to-failure of a system.
Step 2: Data acquisition, pre-processing and analysis
This step can arguably make or break the usefulness of your machine learning workflow. Whether or not you’ll get meaningful “answers” has everything to do with the data at your disposal. (As any seasoned data scientist will tell you, just getting “access” to good data can be an adventure fraught peril!) Sure there is the “amount” of data to consider, but also the quality and format of the data should also be considered. For example:
- Will analyzing a data set of 100,000 emails that were flagged as spam by users over a 12-month period be sufficient?
- Due to storage and compute resource constraints, I can only train my models on low-resolution images. I do know however that high-resolution images will likely give me more accurate results.
- Can my model handle both structured and unstructured data or do I have to “normalize” it in some way? What is the effect excluding data I cannot operate on that I know will be valuable to use in training?
In general, the more data you have at your disposal the better. The more relevant, accurate, consistent and uniform that it is, and (depending on the use case) also spans a large enough of a relevant epoch, the better the training runs will likely be. And in turn, the more satisfactory the solution to the problem you identified in Step 1.
Step 3: Framework and algorithm selection
Ok, so at this point you have a clear idea of what the problem is that you are trying to solve and the data you’ll need to help you solve the problem. The next step involves choosing an ML framework, settling on the algorithms that will be required to operate on your data and coding up your models.
An ML framework can be any piece of software, API, or library that lets you develop your models easily, without imposing the need for a deep understanding of the underlying algorithms it supports. Examples of ML frameworks include TensorFlow, Pytorch, Scikit-learn and many others. Some frameworks lean towards generic use cases, while others cater to very specific use cases.
In general, machine learning algorithms fall into three broad categories:
- Supervised learning: for example regression, random forest
- Unsupervised learning: for example apriori, k-means
- Reinforcement learning: for example Markov decision process
Note that the algorithm(s) you decide on as necessary for your workflow may determine your framework choices. Why? Not all frameworks support all the algorithms employed in data science..
Step 4: Train, validate, test and tune
In this step you actually train and test your model against your data set. There are typically three iterations that you go through during this step.
- Training set: The data used to “train” the model. For example 80,000 emails from a set of 100,000 we know are spam.
- Validation set: The data set used to tune or “validate” the outputs. For example, the remaining 20,000 emails from the set 100,000 we know are spam.
- Test set: The data set used to test the accuracy of your training and tuning. For example, a brand new set of 50,000 emails we know are spam, but the model has never trained or validated against.
Step 5: Iterate
Depending on the results, you may need to rethink the scope of your problem, the data set being used to train your models, your framework or algorithm selection or perhaps additional testing, validation and tuning runs are required. You may also discover you have “over-fitted” or “overtrained” your models!
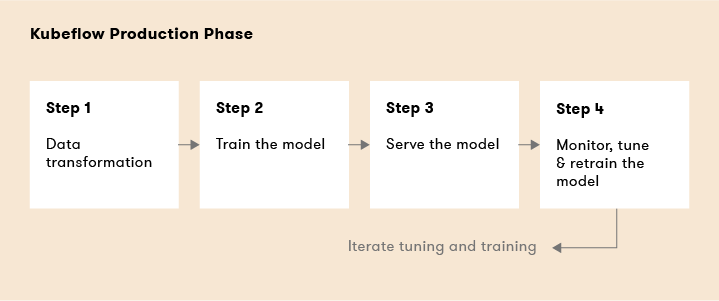
Production Phase
Ok, we are done experimenting, let’s get these models into production! At a high-level here’s the typical steps that are required to bring models to production.
Step 1: Data transformation
In this step we’ll once again need to transform the data into the required format. In this case the production data set. This is done so that the model behaves consistently during training. Typically, this should be the same as Step 2 in the experimental phase. But, we might be dealing with bigger data sets, for example 100,000,000 emails vs the 100,000 from the previously mentioned, ongoing example of a spam detection system. How we “prep” the data should be identical however if we want accurate results.
Step 2: Train the model
Similar to Step 4 in the experimental phase except we are training with a production data set.
Step 3: Serve the model
Here we “deploy” the model into production. In our ongoing spam example, this might mean operating on email as it shows up in real time or analyzing large sets of email once an hour in a batch mode.
Step 4: Monitor, tune and retrain the model
You obviously will want to monitor your model in production and feed back any insights into the model. Whether they be additional tuning opportunities, problems with data, resource issues, etc that were discovered post-production.
A Kubeflow-centric machine learning workflow
Ok, so the above ML workflow was pretty technology agnostic, so what would a Kubeflow-centric workflow look like?
Kubeflow Experimental Phase
Kubelfow components used in the steps above include:
- Step 1: Problem Identification
- Step 2: Data acquisition, pre-processing and analysis
- Step 3: Framework and algorithm selection – Pytorch, sckit-learn, TensorFlow, XGBoost
- Step 4: Train, validate, test and tune – Jupyter Notebook, Kale, Pipelines, Katib
Kubeflow Production Phase
- Step 1: Data transformation
- Step 2: Train the model – Pipelines, Chainer, MPI, MXNet, PyTorch, TFJob
- Step 3: Serve the model – Pipelines, KFServing, NVIDIA TensorRT, PyTorch, TFServing, Seldon
- Step 4: Monitor, tune and retrain the model – Pipelines, Metadata, TensorBoard
What’s next? Get up and running with Kubeflow
Stay tuned for the next blog in this series where we’ll focus on how to get up and running with Kubeflow. We’ll explore what different distributions of Kubeflow are available and how to choose the right one given your circumstances, supported platforms (locally, cloud and on-prem), run through a few installations and highlight a few worthwhile add-ons worth augmenting your Kubeflow installation with.
Book a FREE Kubeflow and MLOps workshop
This FREE virtual workshop is designed with data scientists, machine learning developers, DevOps engineers and infrastructure operators in mind. The workshop covers basic and advanced topics related to Kubeflow, MiniKF, Rok, Katib and KFServing. In the workshop you’ll gain a solid understanding of how these components can work together to help you bring machine learning models to production faster. Click to schedule a workshop for your team.
About Arrikto
At Arrikto, we are active members of the Kubeflow community having made significant contributions to the latest 1.4 release. Our projects/products include:
- Kubeflow as a Service is the easiest way to get started with Kubeflow in minutes! It comes with a Free 7-day trial (no credit card required).
- Enterprise Kubeflow (EKF) is a complete machine learning operations platform that simplifies, accelerates, and secures the machine learning model development life cycle with Kubeflow.
- Rok is a data management solution for Kubeflow. Rok’s built-in Kubeflow integration simplifies operations and increases performance, while enabling data versioning, packaging, and secure sharing across teams and cloud boundaries.
- Kale, a workflow tool for Kubeflow, which orchestrates all of Kubeflow’s components seamlessly.


